Learn how to host a static website on Google Cloud Platform using Google Cloud Storage and a custom domain.
🌟 Introduction
Creating a static website has never been easier with Google Cloud Platform (GCP). Whether you're launching a personal project or a business site, leveraging GCP's powerful infrastructure can give you a scalable, robust platform to build upon.
In this guide, we'll walk through the complete process of hosting a static website on GCP using Google Cloud Storage, from setting up your bucket to connecting it to your custom domain.
📋 Requirements
Before starting, you'll need:
- A Google Cloud account (with billing enabled)
- gcloud CLI installed (optional but helpful)
- A domain name you own (e.g. from Google Domains, Namecheap, GoDaddy)
- Your website's static files (e.g. index.html, CSS, JS)
- Domain verification in Google Search Console (for custom domain setup)
🔍 Domain Verification Process:
To use a custom domain with GCP, you'll need to verify domain ownership:
- Go to Google Search Console
- Add a property for your domain (e.g. www.example.com)
- Follow the verification process by adding a DNS TXT record to your domain
- This proves you own the domain and allows GCP to serve content on it
🚀 Step 1 – Set Up a Google Cloud Storage Bucket
The first step is creating a GCS bucket which acts like a folder in the cloud to store your website files.
1. Log in to Google Cloud Console
Go to Google Cloud Console.
2. Create a Bucket
- Navigate to Cloud Storage > Buckets
- Click Create Bucket
- Choose a globally unique name, ideally your domain name (e.g. example.com).
3. Select Location Type
Regional or multi-regional. I used Multi-Region (e.g. asia-south1) for better availability.
4. Set Access Control
Choose Uniform Access Control (recommended for static sites).
5. Complete Bucket Creation
Click Create to finalize your bucket setup.
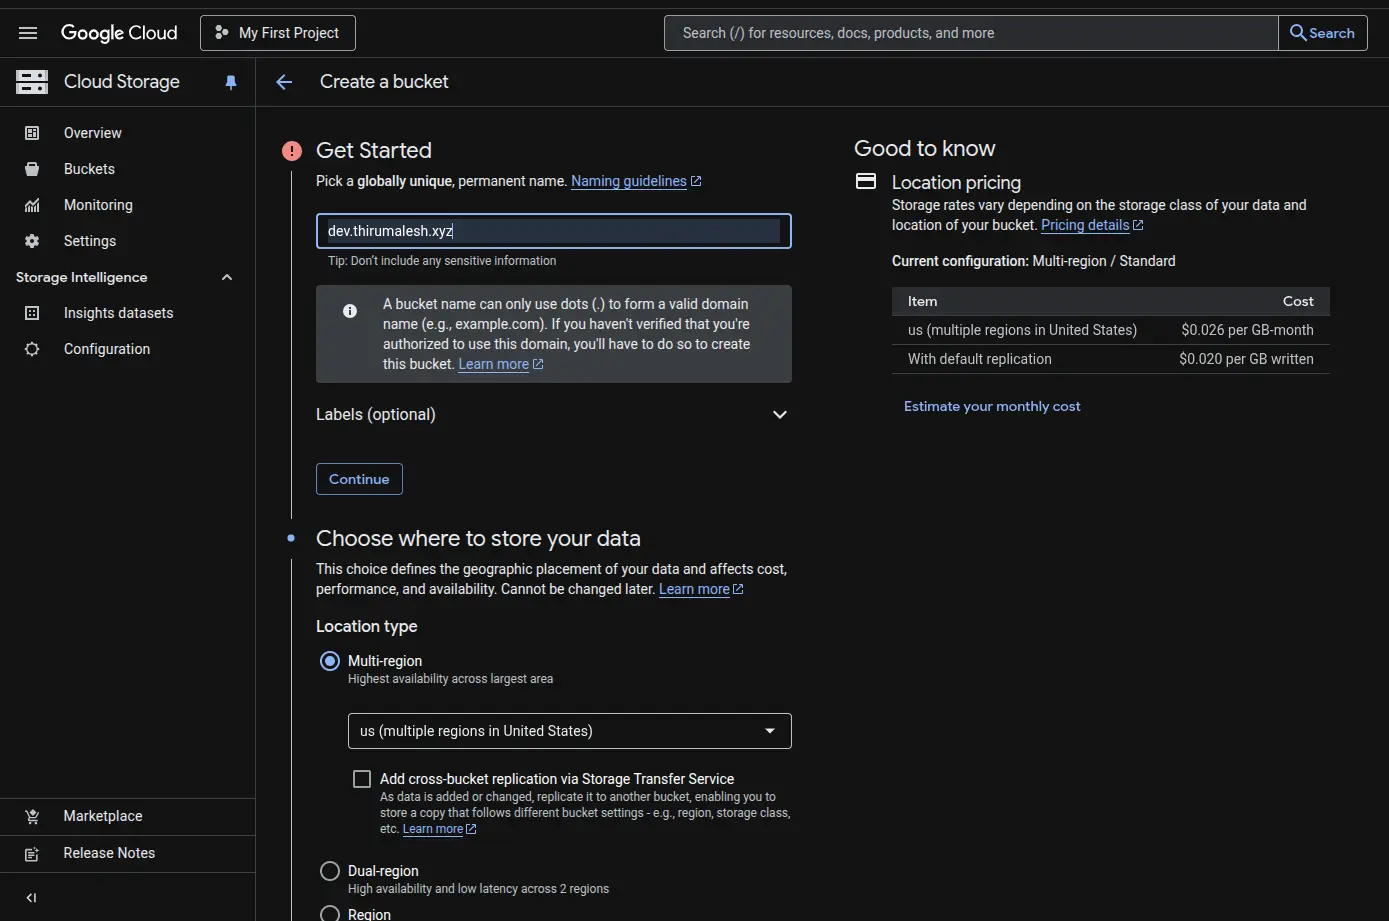
GCP Console - Creating a new bucket with domain name configuration
📂 Step 2 – Upload Your Website Files
Next, upload your static files:
- Go to your bucket in Cloud Console
- Click Upload Files or Upload Folder
- Upload files like index.html, CSS, JS, images, etc.
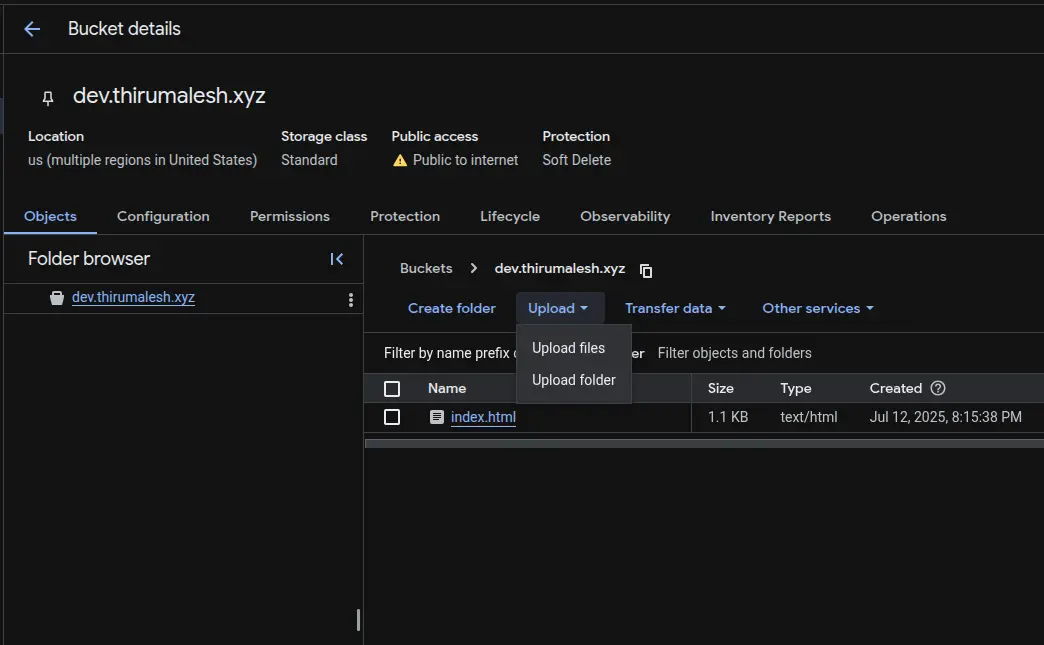
GCP Console - Uploading website files to the bucket
🔓 Step 3 – Configure Bucket for Static Website Hosting
To make GCS serve your files as a website:
- Click into your bucket
- Go to Permissions and click Grant access
- Add principle as "allUsers" and assign role as "Storage Object Viewer"
- And save
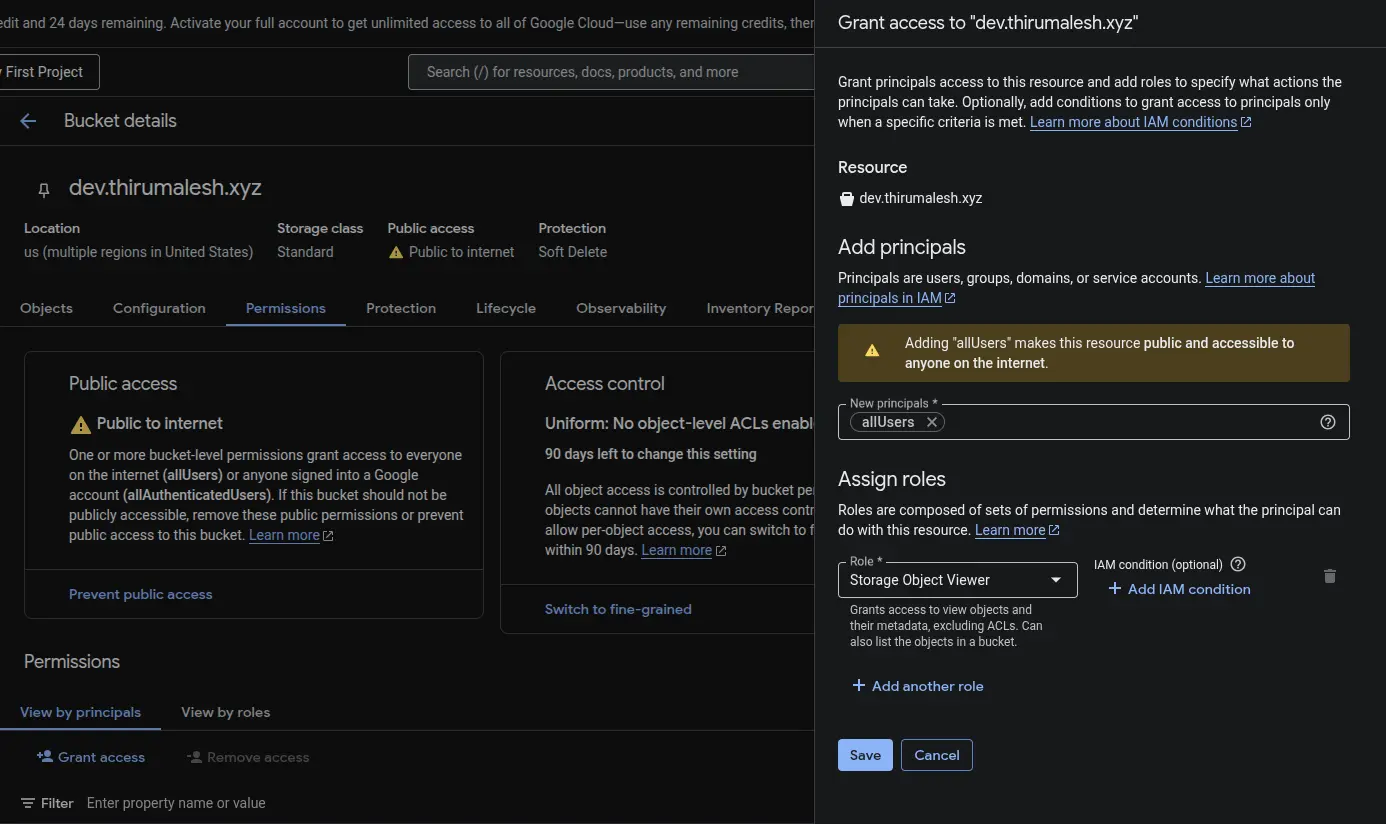
GCP Console - Configuring bucket permissions for public access
🧪 Step 4 – Test Your Website
Find the public link to your bucket's index page:
https://storage.googleapis.com/YOUR_BUCKET_NAME/index.html
Or if you're using the bucket's website endpoint:
http://YOUR_BUCKET_NAME.storage.googleapis.com/
✅ At this stage, my link worked:
https://storage.googleapis.com/dev.thirumalesh.xyz/index.html
🌐 Step 5: Setting Up Custom Domain with Load Balancer
Option 1 — Direct Domain Mapping (Simple)
Set up a load balancer to serve your static site with HTTPS:
✅ How It Works
- Your GCS bucket acts as the origin for your website
- You map your custom domain directly to Google's storage endpoint
c.storage.googleapis.com - Requests to your domain get routed to your bucket based on the bucket name matching your domain
For example:
https://storage.googleapis.com/www.example.com/index.html
When using a custom domain, you'll want users to simply visit:
https://www.example.com
And have that traffic go directly to your bucket.
Set the DNS CNAME Record
In your domain registrar's DNS settings (Cloudflare, Namecheap, GoDaddy, etc.), create a CNAME record:
Type: CNAME
Name: www or your subdomain
Value: c.storage.googleapis.com.
This tells the internet that requests for www.example.com should go to Google's storage servers.
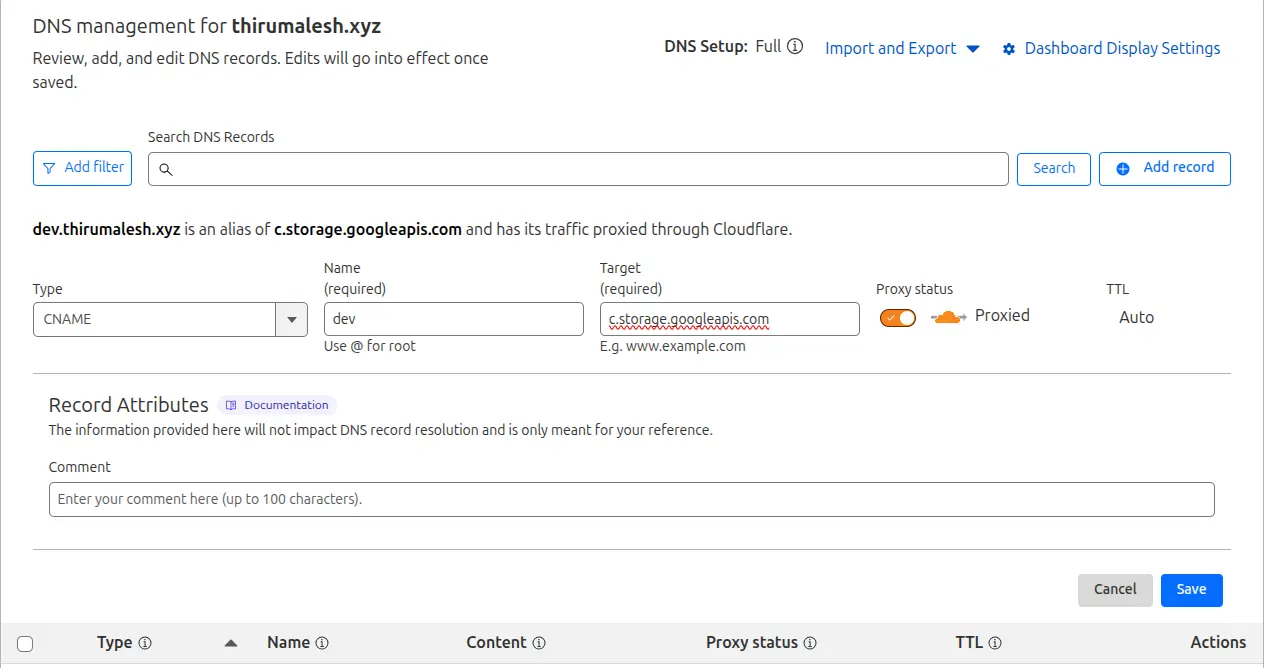
Creating a DNS record
⚠️ Note on Root Domains
Many domain registrars don't support CNAME records at the root domain level (example.com). If you want to serve your root domain:
- Use a redirect service to forward example.com → www.example.com, OR
- Set up a load balancer (see Option 2 below)
✅ Test Your Direct Domain Mapping
Once DNS propagates, visit:
https://www.example.com
✅ At this stage, my link worked perfectly:
Option 2 — Connecting Your Domain via Google HTTPS Load Balancer (Advanced)
If you have more advanced requirements like:
- Serving a root domain without redirects
- Using a Google-managed SSL certificate
- Enabling Cloud CDN
- Custom routing rules
you can connect your GCS bucket via Google's HTTPS Load Balancer.
✅ Steps for Load Balancer Setup
Go to:
https://console.cloud.google.com/net-services/loadbalancing
Choose HTTP(S) Load Balancer → From Internet to my backend.
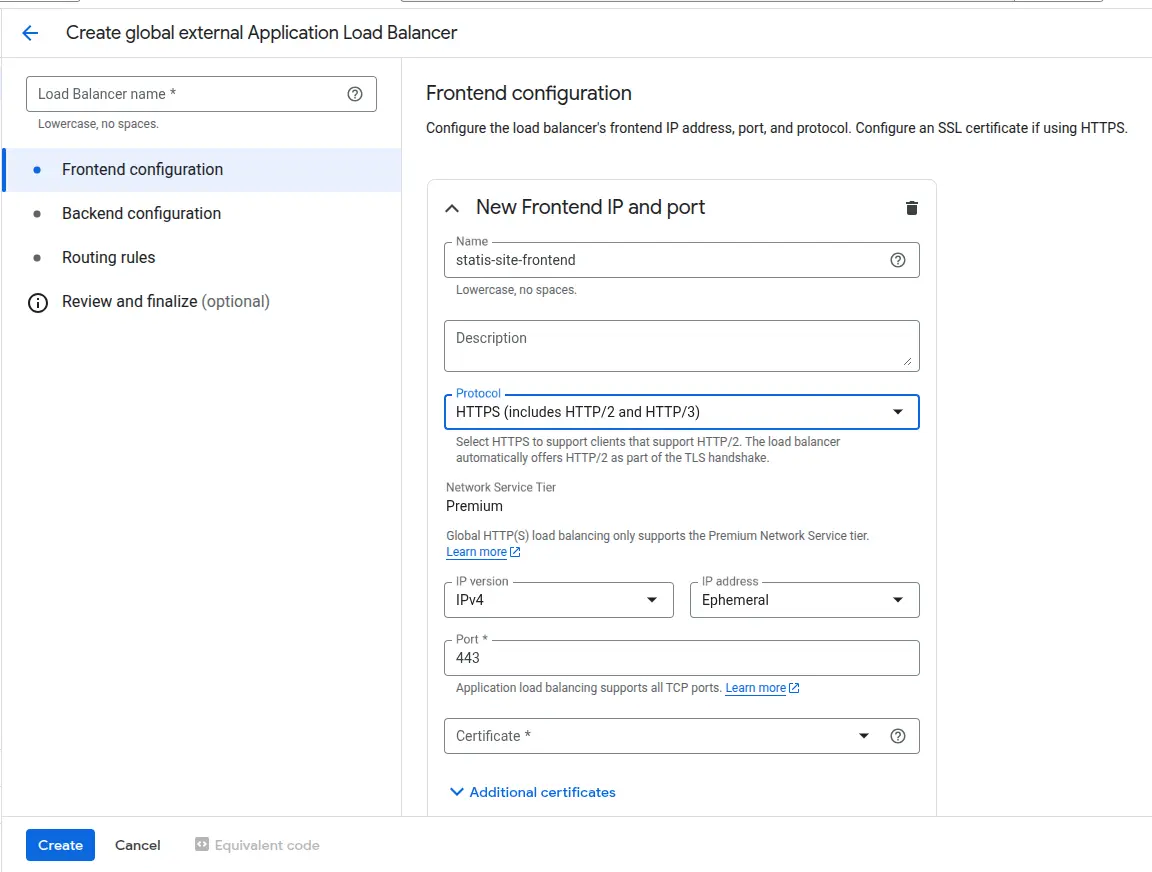
🔧 Frontend Configuration
- Name: static-site-frontend
- Protocol: HTTPS
- IP Version: IPv4
- IP Address: Ephemeral (or reserve one if you prefer)
- Port: 443
- Certificate: Google-managed SSL certificate for your domain
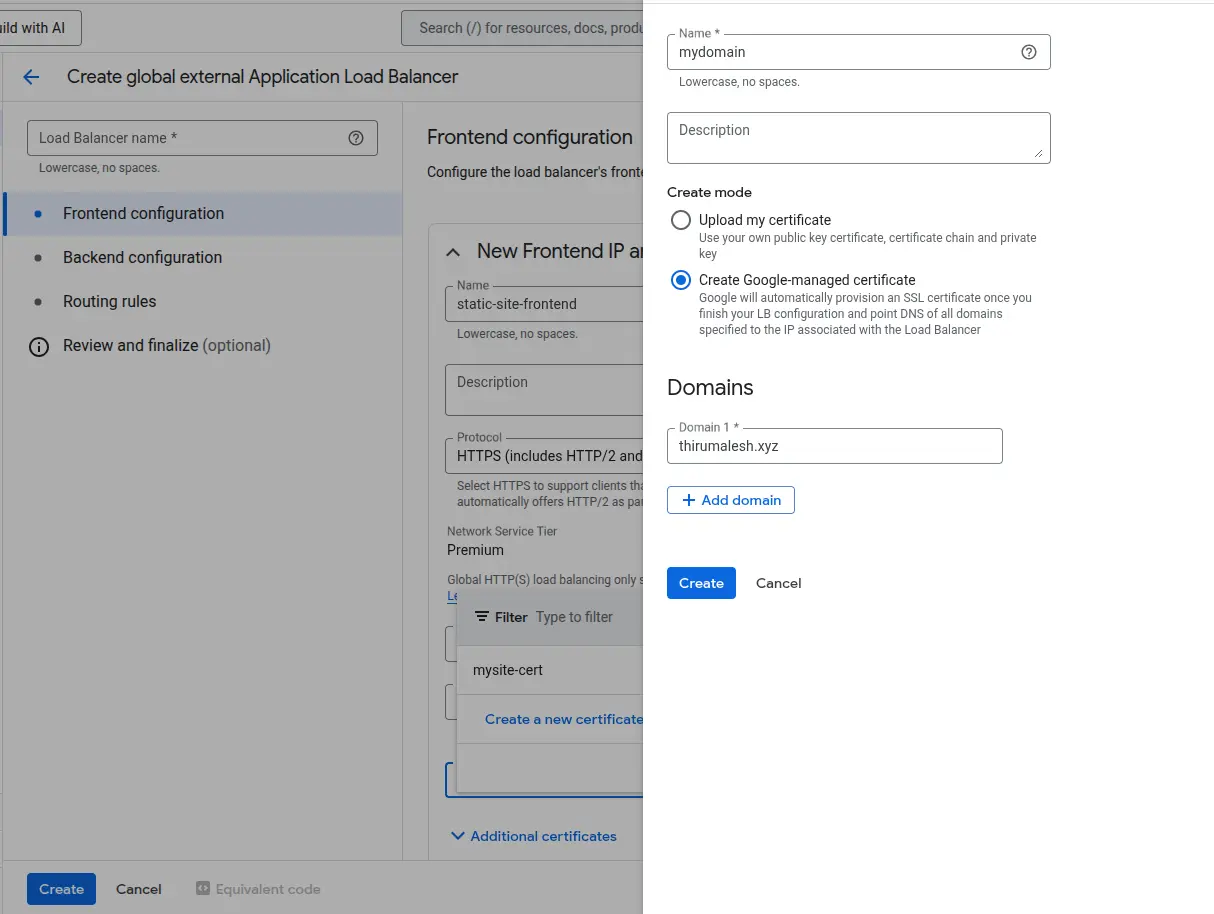
🔒 Certificate Creation
Under the certificate dropdown:
- Click "Create a new certificate"
- Name it (e.g. static-site-cert)
- Type: Google-managed
- Domains: e.g. www.example.com
- Click Create
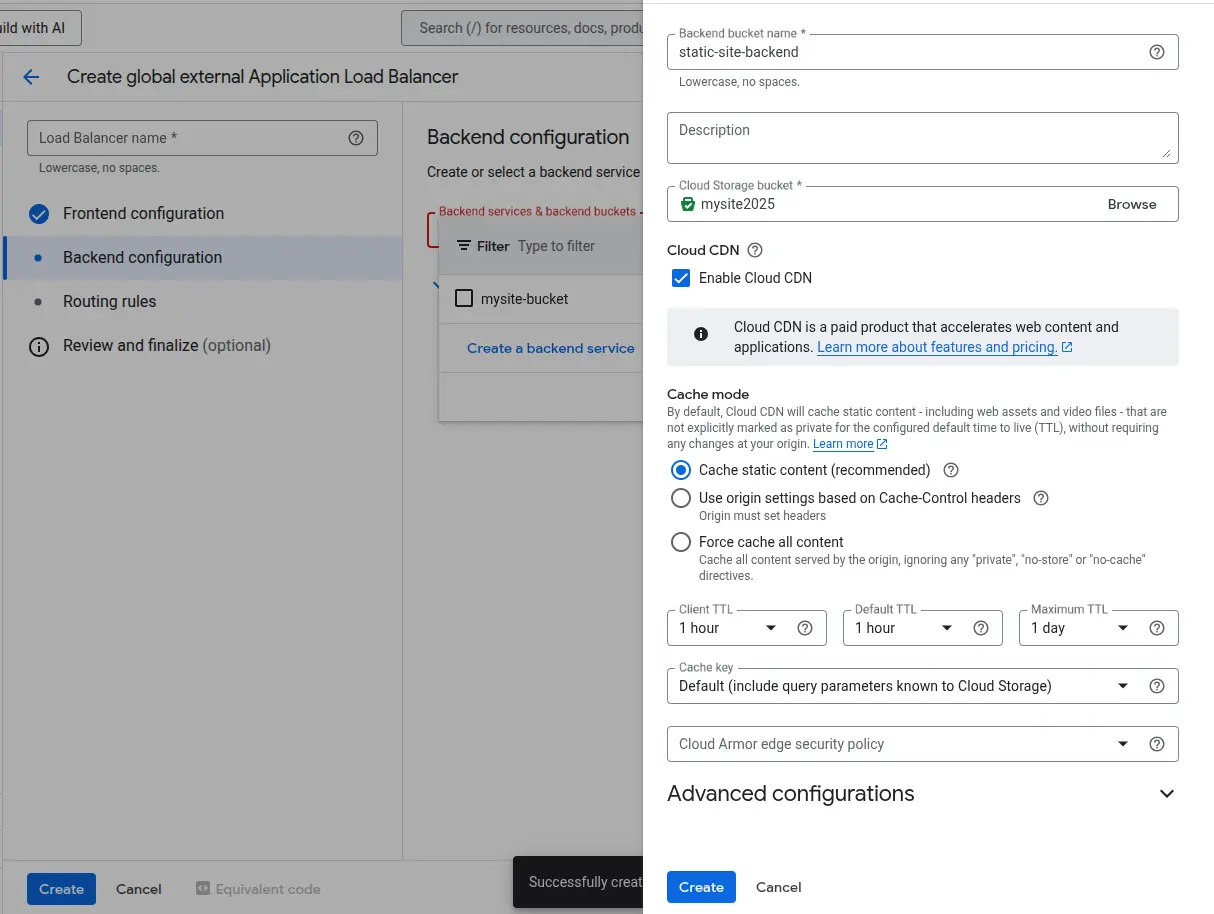
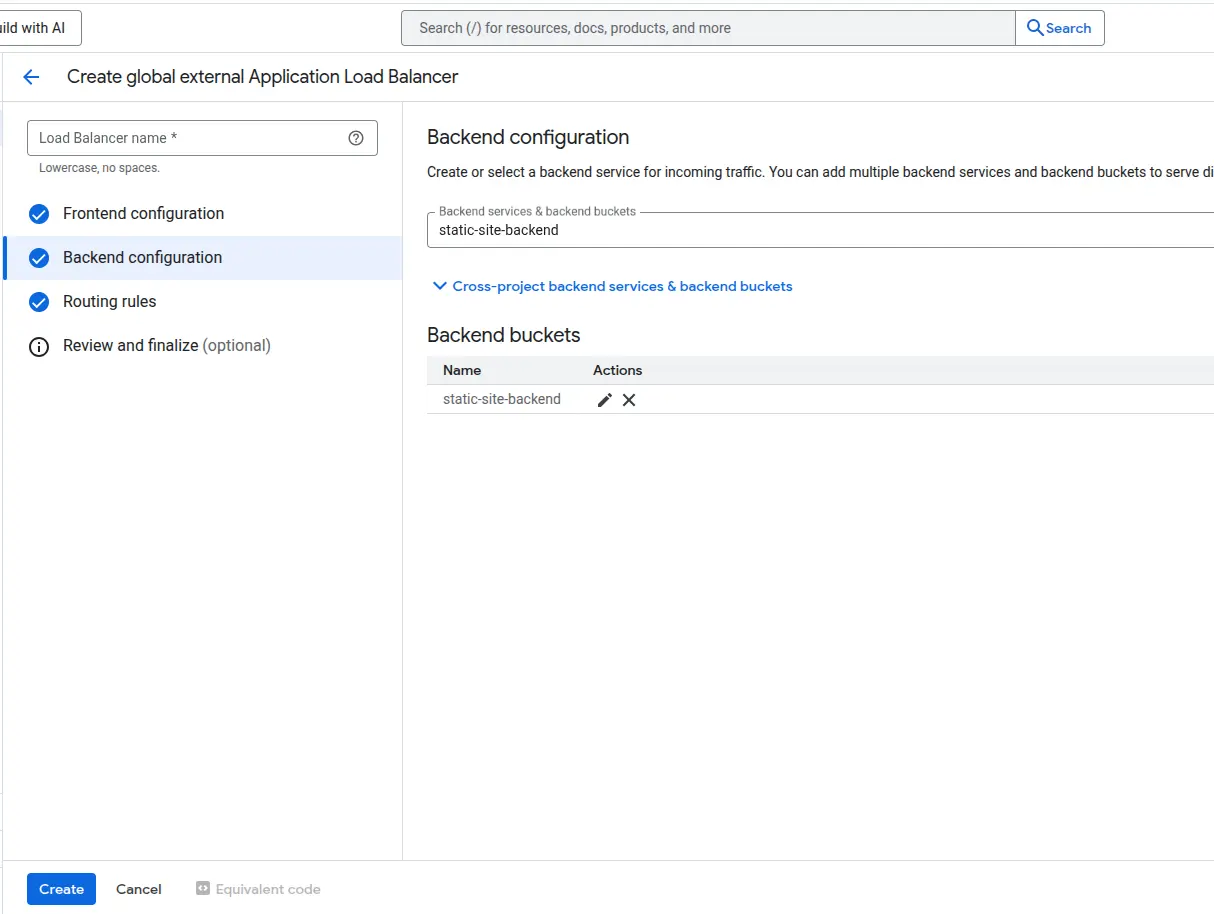
🔧 Backend Configuration
- Click Create Backend Bucket
- Name: static-site-backend
- Select your GCS bucket (e.g., www.example.com)
- Enable Cloud CDN (optional but recommended)
- Click Save
Final Step: Review your configuration and click Create to deploy your load balancer.
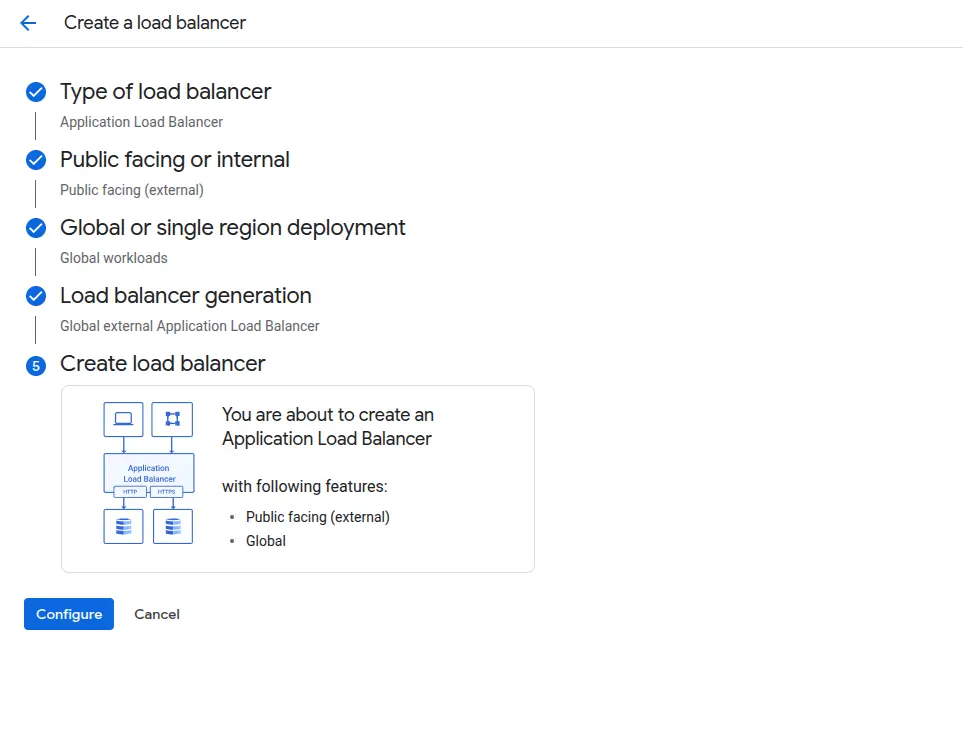
Load balancer configuration and deployment process - Navigate through detailed screenshots
🌐 Set the DNS CNAME Record
In your domain registrar's DNS settings (Cloudflare, Namecheap, GoDaddy, etc.), create a CNAME record:
Type: A
Name: www or your subdomain
IPv4 : xx.xx.xx.xx
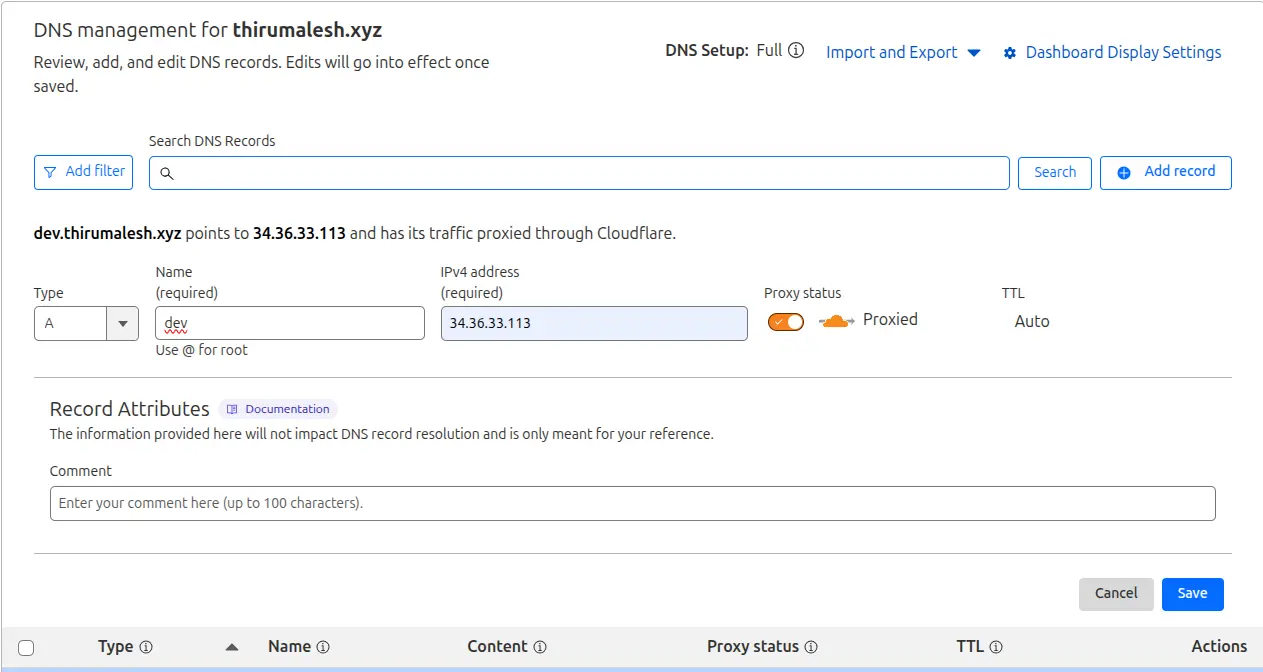
DNS A record configuration pointing to the load balancer IP address
This tells the internet that requests for www.example.com should go to Google's storage servers.
✅ Test Your Load Balancer Domain
Once DNS propagates, visit:
https://www.example.com
✅ At this stage, my link worked perfectly:
🤖 Step 6: Automation & CI/CD
🚀 GitHub Actions Deployment
Create .github/workflows/deploy.yml for automatic deployments:
name: Deploy to GCP

on:
  push:
    branches: [ main ]

jobs:
  deploy:
    runs-on: ubuntu-latest

    steps:
    - uses: actions/checkout@v3

    - id: auth
      uses: google-github-actions/auth@v1
      with:
        credentials_json: ${{ secrets.GCP_SA_KEY }}

    - name: Set up Cloud SDK
      uses: google-github-actions/setup-gcloud@v1

    - name: Deploy to GCS
      run: |
        gsutil -m rsync -r -d ./dist gs://yourdomain.com

    - name: Set cache headers
      run: |
        gsutil -m setmeta -h "Cache-Control:public, max-age=31536000" gs://yourdomain.com/**.css
        gsutil -m setmeta -h "Cache-Control:public, max-age=31536000" gs://yourdomain.com/**.js
⚡ Performance Optimization Tips
🎯 Best Practices
- Use Cloud CDN: Enable Cloud CDN for better global performance and caching
- Compress files: Enable gzip compression for text files to reduce bandwidth
- Optimize images: Use WebP format and proper compression for faster loading
- Set proper headers: Configure cache headers for static assets
- Monitor performance: Use Google Cloud Monitoring to track website performance
💰 Cost Optimization
- Choose storage class: Use Nearline or Coldline for infrequently accessed content
- Set lifecycle policies: Automatically transition old versions to cheaper storage
- Monitor usage: Set up billing alerts to track spending
- Use compression: Reduce storage costs by compressing files
🛠️ Troubleshooting Common Issues
🔍 Common Problems & Solutions
- 403 Forbidden: Check bucket permissions and IAM policies
- SSL Certificate not working: Verify domain ownership and DNS propagation
- 404 errors: Ensure index.html and 404.html are properly configured
- Slow loading: Enable Cloud CDN and check cache headers
- DNS issues: Verify DNS records and propagation time (up to 48 hours)
🔧 Useful Commands for Debugging
# Check bucket configuration
gsutil web get gs://yourdomain.com

# List bucket contents
gsutil ls -la gs://yourdomain.com

# Check SSL certificate status
gcloud compute ssl-certificates list

# Test DNS resolution
nslookup yourdomain.com
dig yourdomain.com
🎯 Conclusion
Hosting static websites on Google Cloud Platform provides a robust, scalable, and cost-effective solution for modern web applications. The combination of Cloud Storage, Cloud CDN, and managed SSL certificates creates a powerful hosting environment that can handle traffic at any scale.
Key benefits of this approach include:
- Global performance with automatic CDN
- Cost-effective pay-as-you-go pricing
- Automatic SSL certificate management
- High availability and reliability
- Easy CI/CD integration
Whether you're hosting a personal blog, portfolio, documentation site, or a single-page application, GCP's static hosting solution provides enterprise-grade infrastructure with minimal configuration and maintenance.
Start with the basic setup and gradually add features like CDN, monitoring, and automation as your needs grow. The scalability and flexibility of GCP ensure your website can evolve with your requirements.